

Installing Natural Stone Steps: A Complete Guide to Stone Step Installation
- travis81tenhoff9
- May 11
- 5 min read
Installing natural stone steps can transform any outdoor space into a stunning, durable, and functional area. Whether you are enhancing a garden, creating a pathway, or adding access to a patio, stone steps offer timeless beauty and long-lasting strength. In this guide, I will walk you through the entire process of stone step installation, sharing practical tips and expert advice to help you achieve professional results.
Planning Your Stone Step Installation
Before you begin the physical work, careful planning is essential. Start by assessing the location where you want to install the steps. Consider the slope, soil type, and drainage. These factors will influence the design and materials you choose.
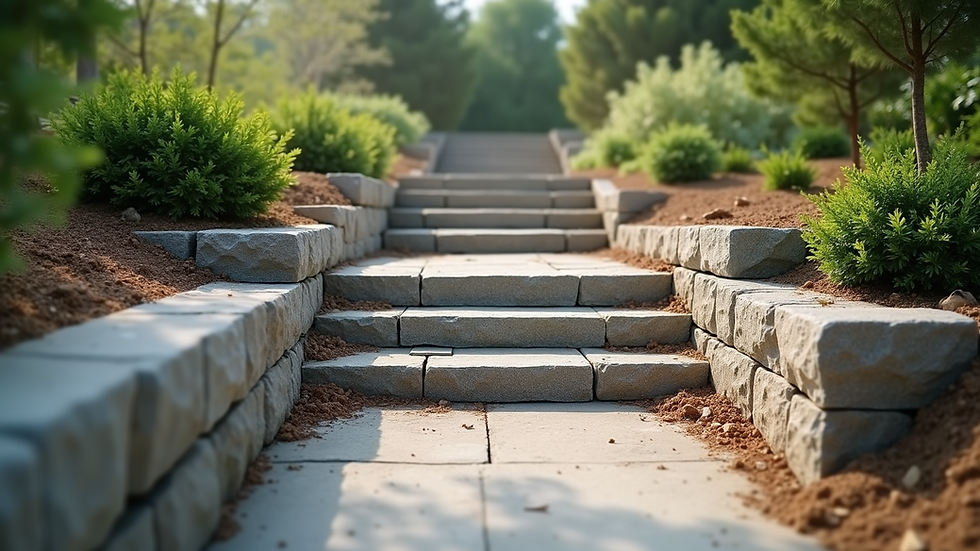
Measure the height from the lower ground to the upper level where the steps will lead. Divide this height by the number of steps you want to create. A comfortable step height usually ranges between 6 and 7 inches. Also, decide on the tread depth, which should be at least 12 inches to provide enough space for footing.
Choose the type of natural stone that fits your aesthetic and functional needs. Popular options include flagstone, slate, limestone, and granite. Each stone has unique characteristics in terms of color, texture, and durability. For example, granite is extremely durable and ideal for high-traffic areas, while flagstone offers a rustic, natural look.
Once you have your measurements and materials, sketch a rough layout of the steps. This will help you visualize the project and communicate your plan if you hire professional help.
Preparing the Site for Stone Step Installation
Proper site preparation is crucial for a successful stone step installation. Start by clearing the area of any vegetation, debris, or loose soil. Use a shovel or a small excavator to dig out the space where the steps will be placed. The depth of the excavation should accommodate the base material, the stone thickness, and a layer of sand or mortar.
Next, create a solid foundation by laying a base of crushed stone or gravel. This base should be about 4 to 6 inches deep and compacted firmly using a tamper or plate compactor. A well-compacted base prevents shifting and settling over time, ensuring the steps remain stable.
After the base is ready, add a layer of sand or stone dust on top. This layer acts as a leveling bed for the stones. Use a rake and a level to smooth and even out the surface. Check the slope to ensure water will drain away from the steps, preventing pooling and damage.

What do you put under stepping stones?
Understanding what to put under stepping stones is key to durability and safety. The base material supports the stones and prevents movement. Typically, a combination of crushed stone and sand works best.
Start with a 4 to 6-inch layer of crushed stone or gravel. This layer provides drainage and stability. It also helps prevent frost heave in colder climates by allowing water to drain away from the stones.
On top of the crushed stone, add a 1 to 2-inch layer of coarse sand or stone dust. This layer helps level the stones and fills gaps underneath, reducing wobbling. Avoid using fine sand alone, as it can wash away over time.
For extra stability, especially on steeper slopes or heavy-use areas, consider using a concrete or mortar bed. This method involves setting the stones in a mixture of cement and sand, creating a permanent bond. However, it requires more skill and time.
Regularly check the level and alignment of each stone as you lay them. Adjust the base material as needed to ensure a flat, secure surface.
Laying and Securing the Natural Stone Steps
With the base prepared, you can begin laying the stones. Start at the bottom step and work your way up. Place each stone carefully, ensuring it sits firmly on the base without rocking.
Use a rubber mallet to tap the stones into place gently. This helps them settle into the sand or mortar bed. Check the level frequently with a carpenter’s level, both front to back and side to side.
If you are using mortar, apply a layer on the base before setting the stone. Press the stone into the mortar and tap it down. Fill any gaps between stones with mortar or sand to lock them in place.
For dry-laid steps, fill the joints between stones with polymeric sand or fine gravel. This material hardens when wet, preventing weed growth and stabilizing the stones.
Pay attention to the edges of the steps. Use smaller stones or cut stones to create clean, safe edges. This detail improves the overall appearance and reduces tripping hazards.

Finishing Touches and Maintenance Tips
Once the stones are laid, it is time to finish the installation with some final touches. Clean the surface of the stones with a broom or brush to remove excess sand or mortar. If you used mortar, allow it to cure according to the manufacturer’s instructions before walking on the steps.
Consider sealing the stones with a high-quality stone sealer. Sealing protects the surface from stains, weathering, and moss growth. Choose a sealer suitable for the type of stone you installed and follow the application guidelines carefully.
Regular maintenance will keep your stone steps looking great and functioning well. Sweep the steps regularly to remove dirt and debris. Inspect the stones periodically for any signs of movement or damage. Refill joints with sand or polymeric sand as needed.
If moss or algae develop, clean the stones with a mild detergent and water solution. Avoid harsh chemicals that can damage the stone or surrounding plants.
By following these steps, you ensure your natural stone steps remain a beautiful and durable feature for years to come.
Why Choose Professional Stone Step Installation?
While installing stone steps can be a rewarding DIY project, professional installation offers several advantages. Experts have the experience and tools to handle complex site conditions, ensuring the steps are safe, level, and long-lasting.
Professionals can also help you select the best stone type and design to complement your outdoor space. They understand local climate challenges and can recommend appropriate materials and installation techniques.
Choosing professional stone step installation guarantees quality workmanship and peace of mind. It also saves time and reduces the risk of costly mistakes.
If you want a flawless finish and durable results, consider consulting with a trusted outdoor construction company. They can provide a comprehensive service from design to installation, tailored to your specific needs.
For those interested, I recommend exploring natural stone steps installation services to ensure your project is handled with expertise and care.
By following this complete guide, you can confidently plan and execute your stone step installation project. With proper preparation, careful laying, and ongoing maintenance, your natural stone steps will enhance your outdoor space with elegance and durability.


Comments